ESXi scripted unattended installation via PXE for any build/image. PowerCLI generates all relevant files.
As part of the project Get-EsxCli on steroids, I need to install a new ESXi host for each new ESXi build.
So far, 23/04/2015, 51 ESXi build from the version 5.0 to 6.0
At this scale, an interactive installation is not an option.
Unattended installation was necessary.
Scripted installation based on PXE boot has been selected due to its simplicity…
…when combined with PowerCLI.
Contents
Home lab overview
ESXi whitebox 64 GB
Workstation with Windows 8.1 with 16GB and PowerCLI “Release 6.0 Release 1”
(All scripts in this post have only been tested with the above configuration)
VMware workstation is installed on the workstation and run the vcenter 6.0 VM.
The ESXi whitebox, host all 51 – so far – nested hypervisors.
This post is focused on the ESXi scripted installation via PXE so the script to create the nested hypervisors will be provided only at the end.
Infrastructure servers PXE/TFTP/FTP/DHCP are provided by the Windows workstation via TFTPD32.
This is working well in a lab, however in a production environment you will probably want to import files generated by PowerCLI in enterprise class infrastructure servers.
All scripts in this post are based on the assumption that the PXE server is not only dedicated for VMware.
All VMware images are stored in a subfolder “vmware”, other subfolders could be created for Linux or Windows for example.
Configuration of infrastructure servers PXE/TFTP/FTP/DHCP
An excellent article on this topic has been written by Ivo Beerens.
Create a VMware ESXi 5 PXE unattended scripted installation using Windows
My home lab is heavily inspired from his post, with some minor differences:
Windows 8.1 (was XP SP2)
TFTPD32 4.5 (was 4.0)
FileZilla server 0.9.49 (was 0.9.39)
Network 10.0.0.0/24 (was 192.168.1.0/24)
…and a major one:
51 ESXi build (was one)
Folder structure in the Windows 8.1 workstation:
C:\VMware\ISO
C:\VMware\Patches
C:\PXEBOOT\VMware (The base directory of the tftp server is still “C:\PXEBOOT” )
C:\PXEBOOT\pxelinux.cfg
C:\FTP\kickstart
Scripted creation of all ISO from VMware patches
Download all patches from VMware to the folder “C:\VMware\Patches”
Run the following script from PowerCLI
Get-ChildItem -path "C:\VMware\Patches" -Recurse -include *.zip | foreach-object{
$ESXSoftwareDepot = Add-EsxSoftwareDepot $_.fullname
get-esxImageProfile | where {$_.Name -notlike "*tools"} |foreach-object{
$IsoFullPath = "C:\VMware\ISO\" + $_.name + ".iso"
Export-esxImageProfile $_.name -ExportToIso -FilePath $IsoFullPath
}
$ESXSoftwareDepot | Remove-EsxSoftwareDepot
}
Output example:
For ESXi550-201502001.zip C:\VMware\ISO\ESXi-5.5.0-20150204001-standard.iso
Note:
The following section in the code is optional, it is used only to save some disk space.
where {$_.Name -notlike "*tools"}
In the example above it will prevent the creation of “ESXi-5.5.0-20150204001-no-tools.iso”
At the end around 80GB are used in my workstation even with the above trick.
It is also possible to add vendor customized ISO in the iso folder like for example from HP.
Scripted population of PXE folder
Eject CD, if any, from the workstation before running this script.
Get-ChildItem -path "C:\VMware\ISO" -Recurse -include *.iso  | foreach-object{
Start-Sleep -s 5
$BaseName = $_.BaseName
Write-Host "Mount Image $BaseName"
Mount-DiskImage $_.fullname
	$CDDriveLetter = "ERROR"
	get-psdrive | where {$_.Description -match "5" -or $_.Description -match "6" }| foreach-object{
	 $CDDriveLetter = $_.root
	}
Write-Host "Drive is $CDDriveLetter"
$SourcePath = $CDDriveLetter + "\*"
$DestinationPath = "C:\PXEBOOT\VMware\" + $BaseName
Write-Host "Will work on $BaseName with  the drive letter $CDDriveLetter"
	new-item $DestinationPath -type directory
	Copy-Item $SourcePath $DestinationPath
Write-Host "Will unmount $_.fullname"
Dismount-DiskImage -ImagePath $_.fullname
Write-Host "$_.fullname unmounted"
}
Scripted fix of all BOOT.cfg
Please check first this excellent post – PXE booting a scripted ESXi 5.x Install – to undersand challenges associated to BOOT.cfg
Get-ChildItem -path "C:\PXEBOOT\VMWARE" -Recurse -include Boot.cfg | foreach-object{
$DirectoryName = $_.DirectoryName
$DirectoryFiltered = 'prefix=' + (($_.DirectoryName -replace [Regex]::Escape("C:\PXEBOOT\"),"") -replace [Regex]::Escape("\"),"/") + "/" + "`n"
$BackupPath = $DirectoryName + "\BOOT.CFG.backup"
	If(Test-Path $BackupPath){
	Write-host "The following backup already exist $BackupPath"
	}
	Else{
	Write-host "No Backup Yet, create one"
	Copy-Item $_.Fullname $BackupPath
	}
$DestinationPath = $DirectoryName + "\BOOT.CFG"
Remove-item $DestinationPath -Force
$NewFile = [System.IO.File]::ReadAllLines($BackupPath)
$stream1 = [System.IO.StreamWriter] $DestinationPath
$NewFile = $NewFile -replace [Regex]::Escape("/"),""
$MyCounter = 0
	$NewFile | foreach-object{
		If($MyCounter -eq 2){
		$stream1.Write("$DirectoryFiltered")
		}
	$NewOutputWithTab = $_.substring(0) + "`n"
	$stream1.Write("$NewOutputWithTab")
	$MyCounter = $MyCounter + 1
	}

$stream1.Close()
$stream1 = $Null
}
This part was actually the most challenging.
Let’s play a little game.
Could you find the differences between these two pictures?
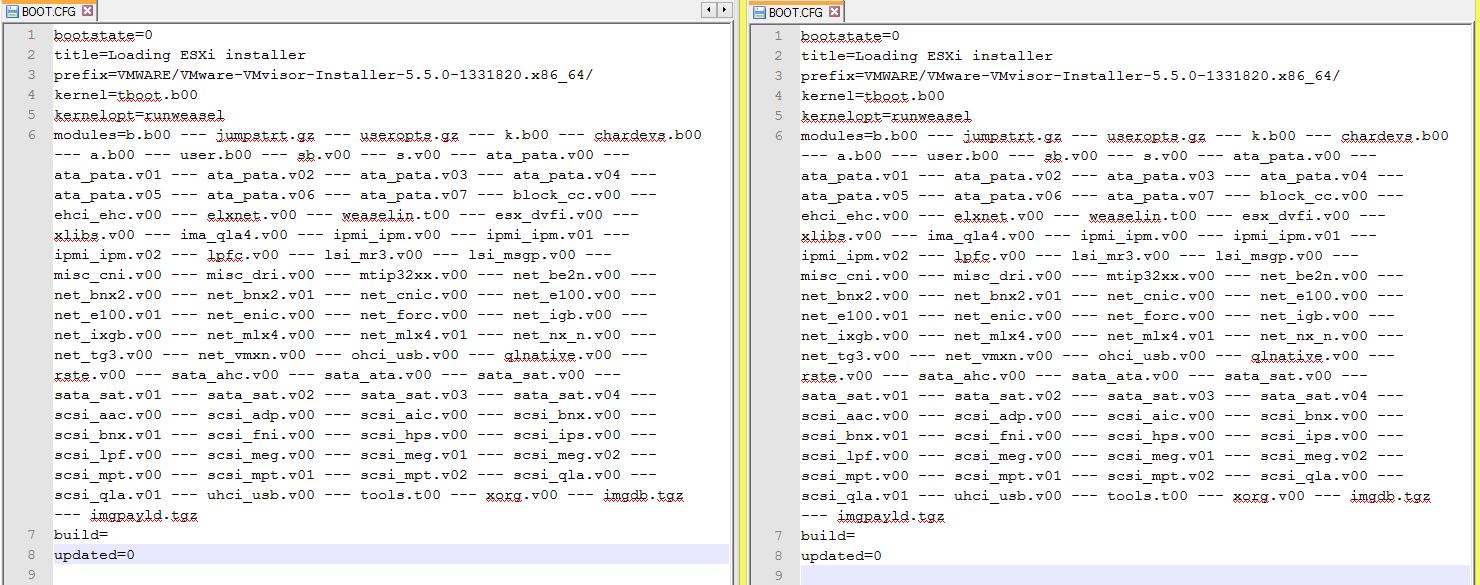
First clue:
With the left BOOT.cfg everything is working fine
With the right BOOT.cfg…errors will be generated while booting with PXE
Second clue:
Notepad++ and “View>Show Symbol>Show All Characters”
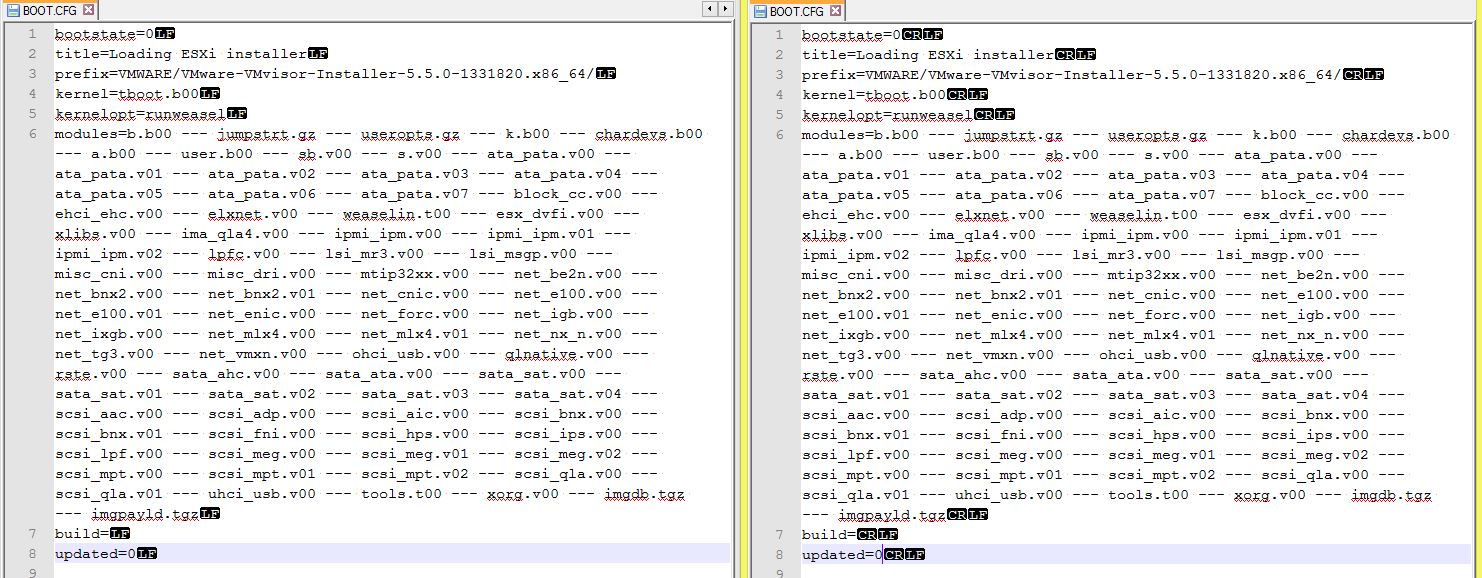
By default files generated with PowerShell use as carriage return “CRLF”
However the BOOT.cfg file, from the Linux world, must use as carriage return “LF”
I let you guess, how much time i have wasted in troubleshooting settings which at the end were correct from the beginning.
After spotting the issue it was still necessary to create files with “LF” instead of “CRLF”.
It is not that straightforward with PowerShell.
Scripted creation of the default PXE configuration file
All scripts are based on the assumption that a subfolder “vmware” has been created in the PXE servers.
New-ESXi_PXE_defaultconf.ps1
New-ESXi_PXE_defaultconf -DestinationFolder 'C:\PXEBOOT\pxelinux.cfg' -PXE_VMware_Folder 'C:\PXEBOOT\VMWARE'
Now if you pxeboot a server you can choose between all “ESXi image”.
This is a good starting point but we are still far from the unattended installation…
Scripted creation of the customized PXE configuration file for each host
New-ESXi_PXE_conf.ps1
With the function above you will be able to create a customized PXE configuration file which will enable a server with a specific MacAddress to pxeboot from a specific ESXi image.
Please note the kickstart/ftp section line, the relevant files will be created in the next section.
The assumption is that all kickstart files will be stored in a FTP server.
If you collect details from your physical servers you can create a csv file with the following columns.
“MacAddress” “Image” “ManagementIP”
Then it will be easy to import this file and call the function New-ESXi_PXE_defaultconf for each row.
Note: The IP will be used in the next section.
My home lab is based on nested ESXi host with one vmnic each.
I have followed a slightly different approach.
First i am using a reference csv file which looks like this.
| Version | Name | ReleaseDate | Build | ToAnalyse | Patch | ImageName | IP | Notes |
|---|---|---|---|---|---|---|---|---|
| 5.0.0 | ESXi 5.0 GA | 24/08/2011 | 469512 | YES | VMware-VMvisor-Installer-5.0.0-469512.x86_64 | VMware-VMvisor-Installer-5.0.0-469512.x86_64 | 10.0.0.100 | |
| 5.0.0 | ESXi 5.0 Patch 1 | 13/09/2011 | 474610 | YES | ESXi500-201109001 | ESXi-5.0.0-20110904001-standard | 10.0.0.101 | |
| 5.0.0 | ESXi 5.0 Express Patch 1 | 03/11/2011 | 504890 | YES | ESXi500-201111001 | ESXi-5.0.0-20111104001-standard | 10.0.0.102 | |
| 5.0.0 | ESXi 5.0 Patch 2 | 15/12/2011 | 515841 | YES | ESXi500-201112001 | ESXi-5.0.0-20111204001-standard | 10.0.0.103 | |
| 5.0.0 | ESXi 5.0 Update 1 | 15/03/2012 | 623860 | YES | update-from-esxi5.0-5.0_update01 | ESXi-5.0.0-20120302001-standard | 10.0.0.104 | |
| 5.0.0 | ESXi 5.0 Express Patch 2 | 12/04/2012 | 653509 | NO | ESXi500-201204001 | ESXi-5.0.0-20120404001-standard | 10.0.0.105 | BUG |
| 5.0.0 | ESXi 5.0 Express Patch 3 | 03/05/2012 | 702118 | YES | ESXi500-201205001 | ESXi-5.0.0-20120504001-standard | 10.0.0.106 | |
| 5.0.0 | ESXi 5.0 Express Patch 4 | 14/06/2012 | 721882 | YES | ESXi500-201206001 | ESXi-5.0.0-20120604001-standard | 10.0.0.107 | |
| 5.0.0 | ESXi 5.0 Patch 3 | 12/07/2012 | 768111 | YES | ESXi500-201207001 | ESXi-5.0.0-20120704001-standard | 10.0.0.108 | |
| 5.0.0 | ESXi 5.0 Patch 4 | 27/09/2012 | 821926 | YES | ESXi500-201209001 | ESXi-5.0.0-20120904001-standard | 10.0.0.109 | |
| 5.0.0 | ESXi 5.0 Update 2 | 20/12/2012 | 914586 | YES | update-from-esxi5.0-5.0_update02 | ESXi-5.0.0-20121202001-standard | 10.0.0.110 | |
| 5.0.0 | ESXi 5.0 Patch 5 | 28/03/2013 | 1024429 | YES | ESXi500-201303001 | ESXi-5.0.0-20130304001-standard | 10.0.0.111 | |
| 5.0.0 | ESXi 5.0 Express Patch 5 | 15/05/2013 | 1117897 | YES | ESXi500-201305001 | ESXi-5.0.0-20130504001-standard | 10.0.0.112 | |
| 5.0.0 | ESXi 5.0 Patch 6 | 29/08/2013 | 1254542 | YES | ESXi500-201308001 | ESXi-5.0.0-20130804001-standard | 10.0.0.113 | |
| 5.0.0 | ESXi 5.0 Update 3 | 17/10/2013 | 1311175 | YES | update-from-esxi5.0-5.0_update03 | ESXi-5.0.0-20131002001-standard | 10.0.0.114 | |
| 5.0.0 | ESXi 5.0 Patch 7 | 23/01/2014 | 1489271 | YES | ESXi500-201401001 | ESXi-5.0.0-20140104001-standard | 10.0.0.115 | |
| 5.0.0 | ESXi 5.0 Patch 8 | 29/05/2014 | 1851670 | YES | ESXi500-201405001 | ESXi-5.0.0-20140504001-standard | 10.0.0.116 | |
| 5.0.0 | ESXi 5.0 Express Patch 6 | 01/07/2014 | 1918656 | YES | ESXi500-201407001 | ESXi-5.0.0-20140704001-standard | 10.0.0.117 | |
| 5.0.0 | ESXi 5.0 Patch 9 | 28/08/2014 | 2000308 | YES | ESXi500-201408001 | ESXi-5.0.0-20140804001-standard | 10.0.0.118 | |
| 5.0.0 | ESXi 5.0 Patch 10 | 04/12/2014 | 2312428 | YES | ESXi500-201412001 | ESXi-5.0.0-20141204001-standard | 10.0.0.119 | |
| 5.0.0 | ESXi 5.0 Patch 11 | 26/02/2015 | 2509828 | YES | ESXi500-201502001 | ESXi-5.0.0-20150204001-standard | 10.0.0.146 | |
| 5.1.0 | ESXi 5.1.0 GA | 10/09/2012 | 799733 | YES | VMware-VMvisor-Installer-5.1.0-799733.x86_64 | VMware-VMvisor-Installer-5.1.0-799733.x86_64 | 10.0.0.120 | |
| 5.1.0 | ESXi 5.1.0a | 25/10/2012 | 838463 | YES | ESXi510-201210001 | ESXi-5.1.0-20121004001-standard | 10.0.0.121 | |
| 5.1.0 | ESXi 5.1 Patch 1 | 20/12/2012 | 914609 | YES | ESXi510-201212001 | ESXi-5.1.0-20121204001-standard | 10.0.0.122 | |
| 5.1.0 | ESXi 5.1 Express Patch 2 | 07/03/2013 | 1021289 | YES | ESXi510-201303001 | ESXi-5.1.0-20130304001-standard | 10.0.0.123 | |
| 5.1.0 | ESXi 5.1 Update 1 | 25/04/2013 | 1065491 | YES | update-from-esxi5.1-5.1_update01 | ESXi-5.1.0-20130402001-standard | 10.0.0.124 | |
| 5.1.0 | ESXi 5.1 Express Patch 3 | 23/05/2013 | 1117900 | YES | ESXi510-201305001 | ESXi-5.1.0-20130504001-standard | 10.0.0.125 | |
| 5.1.0 | ESXi 5.1 Patch 2 | 25/07/2013 | 1157734 | YES | ESXi510-201307001 | ESXi-5.1.0-20130704001-standard | 10.0.0.126 | |
| 5.1.0 | ESXi 5.1 Patch 3 | 17/10/2013 | 1312873 | YES | ESXi510-201310001 | ESXi-5.1.0-20131004001-standard | 10.0.0.127 | |
| 5.1.0 | ESXi 5.1 Update 2 | 16/01/2014 | 1483097 | YES | update-from-esxi5.1-5.1_update02 | ESXi-5.1.0-20140102001-standard | 10.0.0.128 | |
| 5.1.0 | ESXi 5.1 Express Patch 4 | 27/02/2014 | 1612806 | YES | ESXi510-201402001 | ESXi-5.1.0-20140204001-standard | 10.0.0.129 | |
| 5.1.0 | ESXi 5.1 Patch 4 | 29/04/2014 | 1743533 | YES | ESXi510-201404001 | ESXi-5.1.0-20140404001-standard | 10.0.0.130 | |
| 5.1.0 | ESXi 5.1 Express Patch 5 | 17/06/2014 | 1900470 | YES | ESXi510-201406001 | ESXi-5.1.0-20140604001-standard | 10.0.0.131 | |
| 5.1.0 | ESXi 5.1 Patch 5 | 31/07/2014 | 2000251 | YES | ESXi510-201407001 | ESXi-5.1.0-20140704001-standard | 10.0.0.132 | |
| 5.1.0 | ESXi 5.1 Patch 6 | 30/10/2014 | 2191751 | YES | ESXi510-201410001 | ESXi-5.1.0-20141004001-standard | 10.0.0.133 | |
| 5.1.0 | ESXi 5.1 Update 3 | 04/12/2014 | 2323236 | YES | update-from-esxi5.1-5.1_update03 | ESXi-5.1.0-20141202001-standard | 10.0.0.134 | |
| 5.5.0 | ESXi 5.5 GA | 22/09/2013 | 1331820 | YES | VMware-VMvisor-Installer-5.5.0-1331820.x86_64 | VMware-VMvisor-Installer-5.5.0-1331820.x86_64 | 10.0.0.135 | |
| 5.5.0 | ESXi 5.5 Patch 1 | 22/12/2013 | 1474528 | YES | ESXi550-201312001 | ESXi-5.5.0-20131204001-standard | 10.0.0.136 | |
| 5.5.0 | ESXi 5.5 Update 1 | 11/03/2014 | 1623387 | YES | update-from-esxi5.5-5.5_update01 | ESXi-5.5.0-20140302001-standard | 10.0.0.137 | |
| 5.5.0 | ESXi 5.5 Update 1a | 19/04/2014 | 1746018 | YES | ESXi550-201404001 | ESXi-5.5.0-20140404001-standard | 10.0.0.138 | |
| 5.5.0 | ESXi 5.5 Express Patch 3 | 19/04/2014 | 1746974 | YES | ESXi550-201404020 | ESXi-5.5.0-20140401020s-standard | 10.0.0.139 | |
| 5.5.0 | ESXi 5.5 Express Patch 4 | 11/06/2014 | 1881737 | YES | ESXi550-201406001 | ESXi-5.5.0-20140604001-standard | 10.0.0.140 | |
| 5.5.0 | ESXi 5.5 Patch 2 | 01/07/2014 | 1892794 | YES | ESXi550-201407001 | ESXi-5.5.0-20140704001-standard | 10.0.0.141 | |
| 5.5.0 | ESXi 5.5 Update 2 | 09/09/2014 | 2068190 | YES | update-from-esxi5.5-5.5_update02 | ESXi-5.5.0-20140902001-standard | 10.0.0.142 | |
| 5.5.0 | ESXi 5.5 Patch 3 | 15/10/2014 | 2143827 | YES | ESXi550-201410001 | ESXi-5.5.0-20141004001-standard | 10.0.0.143 | |
| 5.5.0 | ESXi 5.5 Express Patch 5 | 02/12/2014 | 2302651 | YES | ESXi550-201412001 | ESXi-5.5.0-20141204001-standard | 10.0.0.144 | |
| 5.5.0 | ESXi 5.5 Patch 4 | 27/01/2015 | 2403361 | YES | ESXi550-201501001 | ESXi-5.5.0-20150104001-standard | 10.0.0.145 | |
| 5.5.0 | ESXi 5.5 Express Patch 6 | 05/02/2015 | 2456374 | YES | ESXi550-201502001 | ESXi-5.5.0-20150204001-standard | 10.0.0.147 | |
| 6.0.0 | ESXi 6.0 GA | 12/03/2015 | 2494585 | YES | VMware-ESXi-6.0.0-2494585-depot | ESXi-6.0.0-2494585-standard | 10.0.0.148 | New |
| 6.0.0 | ESXi 6.0 Express Patch 1 | 09/04/2015 | 2615704 | YES | ESXi600-201504001 | ESXi-6.0.0-20150404001-standard | 10.0.0.149 | New |
| 5.5.0 | ESXi 5.5 Express Patch 7 | 07/04/2015 | 2638301 | YES | ESXi550-201504001 | ESXi-5.5.0-20150402001-standard | 10.0.0.150 | New |
| 5.1.0 | ESXi 5.1 Patch 7 | 26/03/2015 | 2583090 | YES | ESXi510-201503001 | ESXi-5.1.0-20150304001-standard | 10.0.0.151 | New |
This file has been created manually.
All IPs are outside of the DHCP scope to avoid IP conflicts.
At this stage we are only interested by the following columns.
Build
ImageName
Notes:
The ImageName is matching the name in the associated folder in “C:\PXEBOOT\VMWARE”
The naming convention for nested host VMs in this lab is “Build_VM”. For example “2615704_VM”
Connect-VIServer -Server "10.0.0.8" -User "administrator@vsphere.local" -Password "MyL@b0123"
 $ReferencePath = "C:\Temp\Reference.csv"
$ReferenceTable = Import-Csv -path $ReferencePath -useculture
$ReferenceTable | Where {$_.Notes -eq "New"} | foreach-object{
$VMname = $_.Build + "_VM"

		Get-vm -name $VMName | get-networkadapter | where {$_.Name -eq "Network adapter 1"} | foreach-object{
		$MacAddress = $_.MacAddress
		}

New-ESXi_PXE_conf -Host_macaddress $MacAddress -DestinationFolder 'C:\PXEBOOT\pxelinux.cfg' -ImageName $_.ImageName -FTPAddress "10.0.0.5" -FTPUser 'vmware' -FTPPassword 'vmware'
}

DIsconnect-VIServer -Server "10.0.0.8" -confirm:$False
Scripted creation of the customized kikstart file for each host
Now let’s create the kickstart files mentioned in the previous section for all hosts.
They will be stored in the FTP server.
The function below will generate a kickstart file for each server.
New-ESXi_ks_conf.ps1
Similar to the previous section, you will find below how this function is used in this lab based on nested Hypervisors.
It will be quite easy to adapt the logic to another scenario.
Connect-VIServer -Server "10.0.0.8" -User "administrator@vsphere.local" -Password "MyL@b0123"

 $ReferencePath = "C:\temp\Reference.csv"
$ReferenceTable = Import-Csv -path $ReferencePath -useculture
$ReferenceTable | Where {$_.Notes -eq "New"} | foreach-object{
$VMname = $_.Build + "_VM"

		Get-vm -name $VMName | get-networkadapter | where {$_.Name -eq "Network adapter 1"} | foreach-object{
		$MacAddress = $_.MacAddress
		}
$HostName = $_.Build + "-HOST"
New-ESXi_ks_conf `
-Host_macaddress $MacAddress `
-DestinationFolder 'C:\FTP\kickstart' `
-Miscellaneous_rootpw "MyL@b01" `
-Miscellaneous_keyboard "Norwegian" `
-Miscellaneous_reboot $True `
-installorUpgrade_Mode 'install' `
-Install_diskSelection_Mode 'firstdisk' `
-Install_overwritevmfs $True `
-Network_bootproto "static" `
-Network_device "vmnic0" `
-Network_ip $_.IP `
-Network_netmask "255.255.255.0" `
-Network_gateway "10.0.0.1" `
-Network_nameserver "10.0.0.5" `
-Network_hostname $HostName

}

DIsconnect-VIServer -Server "10.0.0.8" -confirm:$False
Result
Start your first server and enjoy the show of a scripted installation unattended via PXE.
At the end you will get a new ESXi host, installed from the right image, with the correct management IP address.
Notes:
In my lab, with 2 or 3 servers started concurrently the installation is working fine for all of them.
Above 3 the stability is lost. The bottleneck has not been identified yet.
If you are planning to import all files generated in enterprise class infrastructure servers, maybe you will not experience this issue.
What to do next?
You already have the IP and the password of a fresh installed ESXi host.
With PowerCLI, the sky’s the limit
Some example below:
Add the new hosts to vCenter
Configure settings like NTP / syslog
Add hosts to distributed vSwitch and create new interface for VMotion
Use Get-EsxCli on steroids to configure storage claim rules, or anything available with esxcli.
Scripted creation of all nested ESXi hosts
There is nothing really new here.
Published just for the sake of completeness.
“Onyx” was used when configuring a new VM via vSphere Client to generate PowerCLI code.
A new VM has been created with vSphere Web Client based on recommendation for nested ESXi hypervisors.
Differences between the two VMs have been identified by extracting all settings via PowerCLI and API
Last step was to modify slightly the script generated with Onyx to take into account the differences.
The VM generated has only one vmnic but it is enough for a home lab.
There are probably better ways to generate VM for nested hypervisors via PowerCLI.
function CreateNestedHypervisorVM{
	param(
	$Build
	)

	process{
	$FullName = $Build + "_VM"
	If(get-vm -name $FullName){
	}
	Else{
	$config = New-Object VMware.Vim.VirtualMachineConfigSpec
	$config.name = $FullName
	$config.version = "vmx-10" ####Customized
	$config.guestId = "vmkernel5Guest" ####Customized
	$config.nestedHVEnabled = $True ####Customized
	$config.files = New-Object VMware.Vim.VirtualMachineFileInfo
	$config.files.vmPathName = "[SSD3]"
	$config.tools = New-Object VMware.Vim.ToolsConfigInfo
	$config.tools.afterPowerOn = $true
	$config.tools.afterResume = $true
	$config.tools.beforeGuestStandby = $true
	$config.tools.beforeGuestShutdown = $true
	$config.tools.beforeGuestReboot = $true
	$config.flags = New-Object VMware.Vim.VirtualMachineFlagInfo
	$config.flags.snapshotPowerOffBehavior = "powerOff"
	$config.powerOpInfo = New-Object VMware.Vim.VirtualMachineDefaultPowerOpInfo
	$config.powerOpInfo.powerOffType = "preset"
	$config.powerOpInfo.suspendType = "preset"
	$config.powerOpInfo.resetType = "preset"
	$config.powerOpInfo.standbyAction = "checkpoint" ###Customized
	$config.numCPUs = 2
	$config.numCoresPerSocket = 1
	$config.memoryMB = 4096
	$config.deviceChange = New-Object VMware.Vim.VirtualDeviceConfigSpec[] (4)
	$config.deviceChange[0] = New-Object VMware.Vim.VirtualDeviceConfigSpec
	$config.deviceChange[0].operation = "add"
	$config.deviceChange[0].device = New-Object VMware.Vim.VirtualCdrom
	$config.deviceChange[0].device.key = -44
	$config.deviceChange[0].device.backing = New-Object VMware.Vim.VirtualCdromRemotePassthroughBackingInfo
	$config.deviceChange[0].device.backing.deviceName = ""
	$config.deviceChange[0].device.backing.exclusive = $false
	$config.deviceChange[0].device.connectable = New-Object VMware.Vim.VirtualDeviceConnectInfo
	$config.deviceChange[0].device.connectable.startConnected = $false
	$config.deviceChange[0].device.connectable.allowGuestControl = $true
	$config.deviceChange[0].device.connectable.connected = $false
	$config.deviceChange[0].device.controllerKey = 201
	$config.deviceChange[0].device.unitNumber = 0
	$config.deviceChange[1] = New-Object VMware.Vim.VirtualDeviceConfigSpec
	$config.deviceChange[1].operation = "add"
	$config.deviceChange[1].device = New-Object VMware.Vim.VirtualLsiLogicController
	$config.deviceChange[1].device.key = -46
	$config.deviceChange[1].device.busNumber = 0
	$config.deviceChange[1].device.sharedBus = "noSharing"
	$config.deviceChange[2] = New-Object VMware.Vim.VirtualDeviceConfigSpec
	$config.deviceChange[2].operation = "add"
	$config.deviceChange[2].device = New-Object VMware.Vim.VirtualE1000
	$config.deviceChange[2].device.key = -50
	$config.deviceChange[2].device.backing = New-Object VMware.Vim.VirtualEthernetCardNetworkBackingInfo
	$config.deviceChange[2].device.backing.deviceName = "Console"
	$config.deviceChange[2].device.connectable = New-Object VMware.Vim.VirtualDeviceConnectInfo
	$config.deviceChange[2].device.connectable.startConnected = $true
	$config.deviceChange[2].device.connectable.allowGuestControl = $true
	$config.deviceChange[2].device.connectable.connected = $true
	$config.deviceChange[2].device.addressType = "generated"
	$config.deviceChange[2].device.wakeOnLanEnabled = $true
	$config.deviceChange[3] = New-Object VMware.Vim.VirtualDeviceConfigSpec
	$config.deviceChange[3].operation = "add"
	$config.deviceChange[3].fileOperation = "create"
	$config.deviceChange[3].device = New-Object VMware.Vim.VirtualDisk
	$config.deviceChange[3].device.key = -1000000
	$config.deviceChange[3].device.backing = New-Object VMware.Vim.VirtualDiskFlatVer2BackingInfo
	$config.deviceChange[3].device.backing.fileName = ""
	$config.deviceChange[3].device.backing.diskMode = "persistent"
	$config.deviceChange[3].device.backing.split = $false
	$config.deviceChange[3].device.backing.writeThrough = $false
	$config.deviceChange[3].device.backing.thinProvisioned = $true
	$config.deviceChange[3].device.backing.eagerlyScrub = $false
	$config.deviceChange[3].device.connectable = New-Object VMware.Vim.VirtualDeviceConnectInfo
	$config.deviceChange[3].device.connectable.startConnected = $true
	$config.deviceChange[3].device.connectable.allowGuestControl = $false
	$config.deviceChange[3].device.connectable.connected = $true
	$config.deviceChange[3].device.controllerKey = -46
	$config.deviceChange[3].device.unitNumber = 0
	$config.deviceChange[3].device.capacityInKB = 41943040
	$config.cpuAllocation = New-Object VMware.Vim.ResourceAllocationInfo
	$config.cpuAllocation.reservation = 0
	$config.cpuAllocation.limit = -1
	$config.cpuAllocation.shares = New-Object VMware.Vim.SharesInfo
	$config.cpuAllocation.shares.shares = 100
	$config.cpuAllocation.shares.level = "normal"
	$config.memoryAllocation = New-Object VMware.Vim.ResourceAllocationInfo
	$config.memoryAllocation.reservation = 0
	$config.memoryAllocation.limit = -1
	$config.memoryAllocation.shares = New-Object VMware.Vim.SharesInfo
	$config.memoryAllocation.shares.shares = 100
	$config.memoryAllocation.shares.level = "normal"
	$config.firmware = "bios"


	 $pool = (Get-VMHost -name "10.0.0.11" | Get-ResourcePool).ExtensionData.Moref


	 $MyFolder = (get-folder | where {$_.Name -eq "NestedHostVM"}) | get-view

	 $MyFolder.CreateVM_Task($config, $pool, $null)
	 }
	 }
 }


Connect-VIServer -Server "10.0.0.8" -User "administrator@vsphere.local" -Password "MyL@b0123"

 $ReferencePath = "C:\temp\Reference.csv"
$ReferenceTable = Import-Csv -path $ReferencePath -useculture
$MySuperTable = $null
$ReferenceTable | Where {$_.Notes -eq "New"} | foreach-object{
CreateNestedHypervisorVM -Build $_.Build
}


 DIsconnect-VIServer -Server "10.0.0.8" -confirm:$False
three letters for you sir:
RAD
First of all, WOW fantastic job! Really nice scripts and good explanations, thanks.
I came to the step where “Scripted creation of the default PXE configuration file” should generate the default configuration file in ‘C:\PXEBOOT\pxelinux.cfg’ but nothing happens when I ran your script “New-ESXi_PXE_defaultconf.ps1”, I don’t get any error message either, but no file is created.
I have all the directories setup according to your instructions.
C:\VMware\ISO
C:\VMware\Patches
C:\PXEBOOT\VMware (The base directory of the tftp server is still “C:\PXEBOOT” )
C:\PXEBOOT\pxelinux.cfg
C:\FTP\kickstart
Would you know what could be wrong?
Best Regards,
Adam